> For the complete documentation index, see [llms.txt](https://docs.lucernahealth.com/guide/llms.txt). Markdown versions of documentation pages are available by appending `.md` to page URLs; this page is available as [Markdown](https://docs.lucernahealth.com/guide/insights-studio/population-builder/reference-guides/using-populations.md).

# Using populations

A population on its own is a list. Destinations are what turn that list into work. Destinations sit between: Population Builder and the rest of Leap

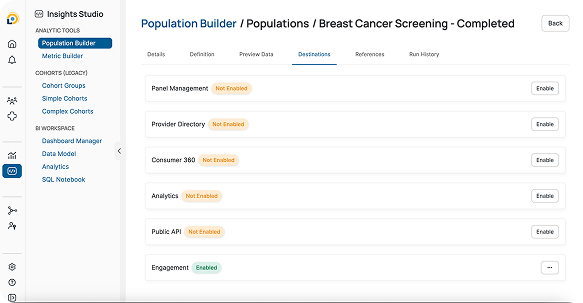
Once you have built your population, you can put it to use by sending it to six different places across Leap. These places are called destinations, and are managed in the Destinations tab on each population.

Destinations help with:

* Sending populations where work happens
* Keep one definition: The same population powers every destination it's enabled for, so a change to the logic carries everywhere.
* Control what gets shared: Enabling a destination requires specific permissions, so populations don't appear downstream by accident.
* Trace usage: The Destinations tab shows exactly where a population is active.

<div data-with-frame="true"><figure><img src="https://content.gitbook.com/content/nXt8wjwK8SlPIzyfLwqU/blobs/re8dRYzmT2G5uiGOz0XJ/Screenshot%202026-08-04%20at%2010.04.40%E2%80%AFAM%201.png" alt=""><figcaption></figcaption></figure></div>

| Destination        | What the population does there                                             | Additional setup |
| ------------------ | -------------------------------------------------------------------------- | ---------------- |
| Panel Management   | Used for patient attribution; appears in panels under Included Populations | Required         |
| Provider Directory | Appears as a filter on provider profiles, under Panel Patients             | Required         |
| Consumer 360       | Appears as a pill on a member's profile if they belong to the population   | Required         |
| Analytics          | Available for use in analytics and reporting                               | None             |
| Public API         | Returned through the API                                                   | None             |
| Engagement         | Available for campaigns and outreach                                       | None             |

***

### Permissions

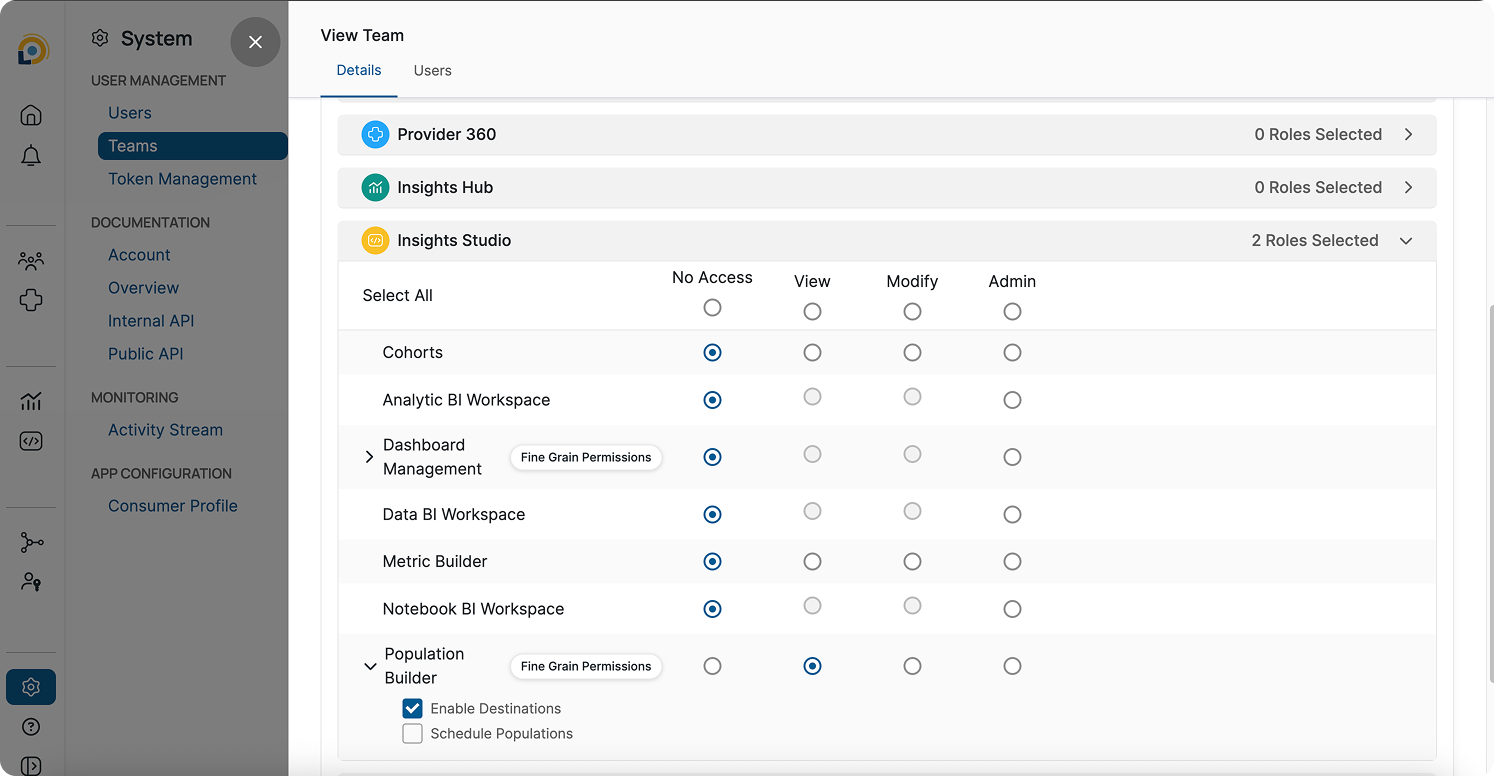
Enabling destinations and sending them to different places across Leap requires special permissions. Permissions are set at the team level, not per individual user.

To grant it:&#x20;

1. Go to System > Teams, select the team and click on it to open
2. In Details tab, scroll to Permissions section
3. Click on the edit icon
4. Go to Insights Studio section, Population Builder and click on Fine Grain Permissions

<div data-with-frame="true"><figure><img src="https://content.gitbook.com/content/nXt8wjwK8SlPIzyfLwqU/blobs/rN38jnpIr2E2t5WLpbpG/Screenshot%202026-08-04%20at%2010.11.10%E2%80%AFAM%201.png" alt=""><figcaption></figcaption></figure></div>

5. Check the box next to Enable Destinations
6. Make sure permission is either set to view, modify or admin
7. Click Save

***

### Enable destinations

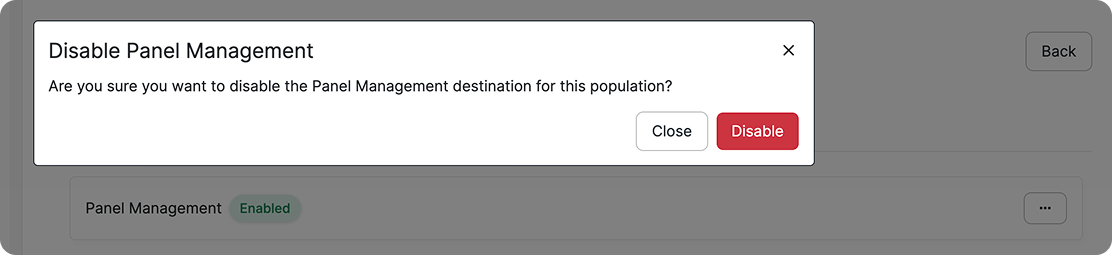
Enabling a destination is straightforward: choose the destination and click "Enable." To disable, click the menu icon and select "Disable."

Enabling a destination

<div data-with-frame="true"><figure><img src="https://content.gitbook.com/content/nXt8wjwK8SlPIzyfLwqU/blobs/g6lpnjOeWveC8bPQJ5UV/Screenshot%202026-08-04%20at%2010.20.01%E2%80%AFAM%201.png" alt=""><figcaption></figcaption></figure></div>

<div data-with-frame="true"><figure><img src="https://content.gitbook.com/content/nXt8wjwK8SlPIzyfLwqU/blobs/FYxGtbLwwLLb2qMGWADS/Screenshot%202026-08-04%20at%2010.20.22%E2%80%AFAM%201.png" alt=""><figcaption></figcaption></figure></div>

Disabling a destination

<div data-with-frame="true"><figure><img src="https://content.gitbook.com/content/nXt8wjwK8SlPIzyfLwqU/blobs/bKxnfegDie0MIf6gX42n/Screenshot%202026-08-04%20at%2010.20.40%E2%80%AFAM%201.png" alt=""><figcaption></figcaption></figure></div>

<div data-with-frame="true"><figure><img src="https://content.gitbook.com/content/nXt8wjwK8SlPIzyfLwqU/blobs/ks2jnqIDUjhhbS3hcRjB/Screenshot%202026-08-04%20at%2010.20.51%E2%80%AFAM%201.png" alt=""><figcaption></figcaption></figure></div>

<div data-with-frame="true"><figure><img src="https://content.gitbook.com/content/nXt8wjwK8SlPIzyfLwqU/blobs/JhLPtXGqDm2a7K7hLsYS/Screenshot%202026-08-04%20at%2010.21.01%E2%80%AFAM%201.png" alt=""><figcaption></figcaption></figure></div>

***

### Setting up individual destinations

Destinations like Panel Management, Provider Directory and Consumer 360 require additional steps to activate the enabled populations where as Analytics, Public API and Engagement destinations require no additional setup. They are ready to be used as soon as they are enabled

#### 1. Panel Management

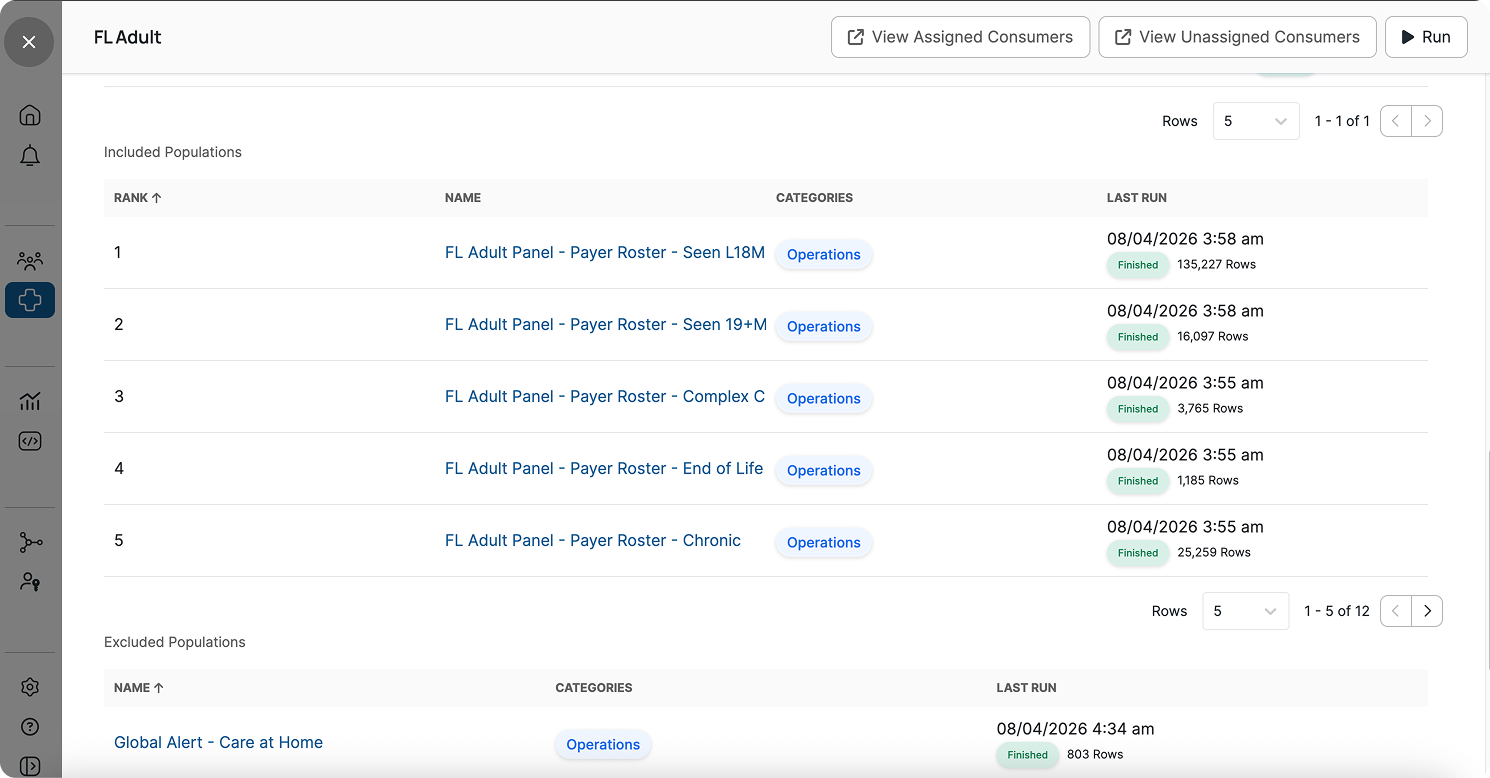
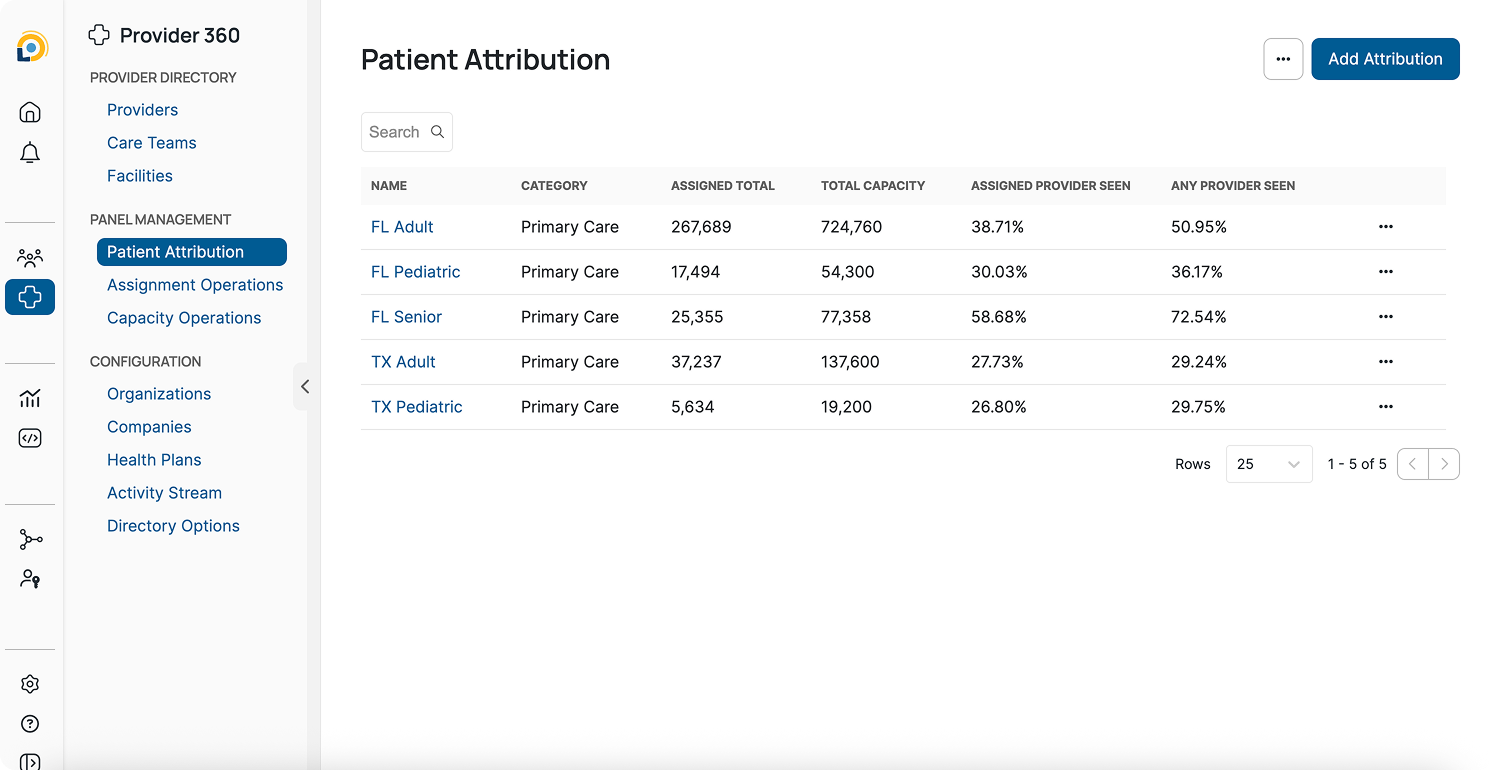
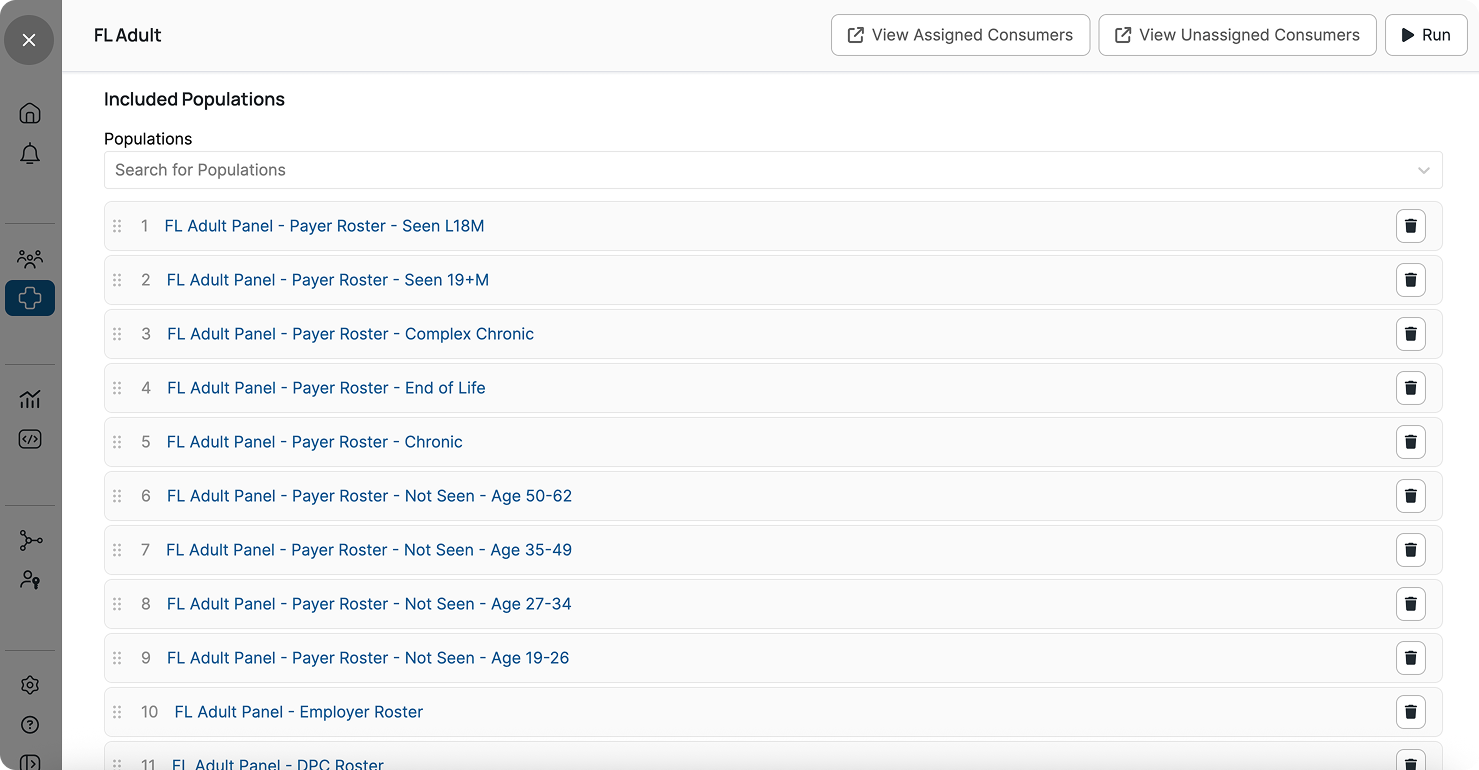
Populations sent to Panel Management can be used for patient attribution. After enabling and configuring they show up in panels in Included Populations section

<div data-with-frame="true"><figure><img src="https://content.gitbook.com/content/nXt8wjwK8SlPIzyfLwqU/blobs/AygoXHNQ0Yuw3wxlMJjd/Screenshot%202026-08-04%20at%2010.47.45%E2%80%AFAM%201.png" alt=""><figcaption></figcaption></figure></div>

To configure:

1. Click on 'Enable' next to Panel Management in Destinations

<div data-with-frame="true"><figure><img src="https://content.gitbook.com/content/nXt8wjwK8SlPIzyfLwqU/blobs/E0md1PHMEUcon5ARBqfn/Screenshot%202026-08-04%20at%2010.49.05%E2%80%AFAM%201.png" alt=""><figcaption></figcaption></figure></div>

<div data-with-frame="true"><figure><img src="https://content.gitbook.com/content/nXt8wjwK8SlPIzyfLwqU/blobs/FYxGtbLwwLLb2qMGWADS/Screenshot%202026-08-04%20at%2010.20.22%E2%80%AFAM%201.png" alt=""><figcaption></figcaption></figure></div>

2. Now to activate, go to Provider 360 > Patient Attribution and select the panel where you want to configure this population

<div data-with-frame="true"><figure><img src="https://content.gitbook.com/content/nXt8wjwK8SlPIzyfLwqU/blobs/D8qJaQ0bPuAJSxX2ossr/Screenshot%202026-08-04%20at%2010.52.05%E2%80%AFAM%201.png" alt=""><figcaption></figcaption></figure></div>

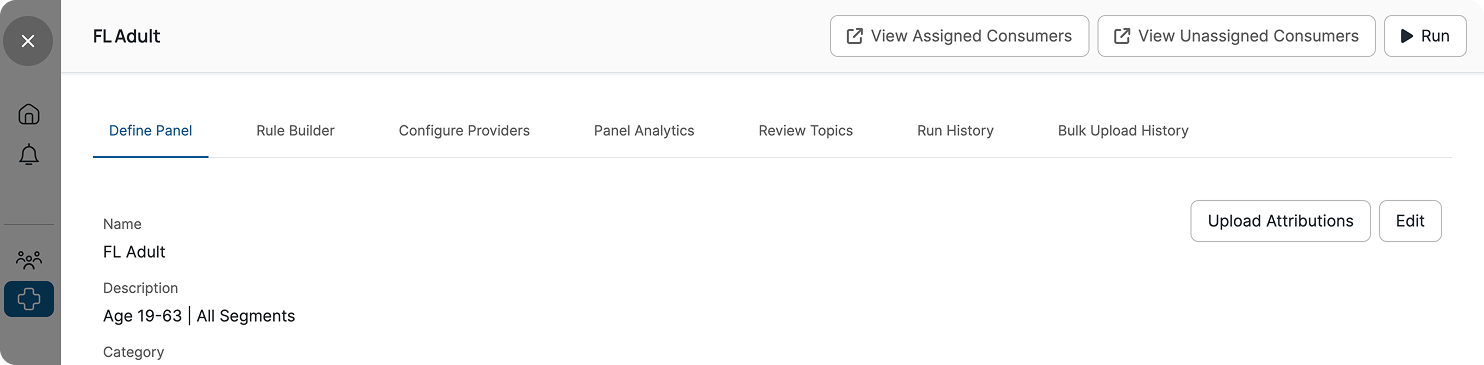
3. Click on the panel to open. In Define Panel tab click 'Edit'

<div data-with-frame="true"><figure><img src="https://content.gitbook.com/content/nXt8wjwK8SlPIzyfLwqU/blobs/rGSdZwXyVlxy9RCL2TiT/Screenshot%202026-08-04%20at%2010.54.27%E2%80%AFAM%201.png" alt=""><figcaption></figcaption></figure></div>

4. Scroll to Included Populations section. Open the "Search for populations" dropdown to select the population you enabled. You can add new population, delete existing population or reorder

<div data-with-frame="true"><figure><img src="https://content.gitbook.com/content/nXt8wjwK8SlPIzyfLwqU/blobs/U3Yp9ppwWKYyNLQaL90D/Screenshot%202026-08-04%20at%2010.55.14%E2%80%AFAM%201.png" alt=""><figcaption></figcaption></figure></div>

5. Click 'Save'

#### 2. Provider Directory

Populations enabled for Provider Directory appear as a filter on provider profiles. Open any provider profile and go to the **Panel Patients** tab to filter patients by population.

<div data-with-frame="true"><figure><img src="https://1578258752-files.gitbook.io/~/files/v0/b/gitbook-x-prod.appspot.com/o/spaces%2FnXt8wjwK8SlPIzyfLwqU%2Fuploads%2FgIZyf5StM0DgGL7UBw3y%2Fdgs.png?alt=media&amp;token=55357abc-cfac-4b73-8e75-4b610d3ddd82" alt=""><figcaption></figcaption></figure></div>

The filter dropdown shows a limited number of populations. The count, order, and which populations appear are all controlled in Directory Options.

To configure:

1. Click Enable next to Provider Directory in the Destinations tab
2. Go to Provider 360 → Directory Options and open the Panel Populations section

<div data-with-frame="true"><figure><img src="https://1578258752-files.gitbook.io/~/files/v0/b/gitbook-x-prod.appspot.com/o/spaces%2FnXt8wjwK8SlPIzyfLwqU%2Fuploads%2FK2YEQSTtSBV5PQTzl5nJ%2FScreenshot%202026-08-24%20at%207.12.35%E2%80%AFPM%201.png?alt=media&amp;token=71ad9ed3-a556-4c94-99f6-4a3e883c63b5" alt=""><figcaption></figcaption></figure></div>

3. Find the population you enabled. A cross in the Visible column means it isn't in use yet

<div data-with-frame="true"><figure><img src="https://1578258752-files.gitbook.io/~/files/v0/b/gitbook-x-prod.appspot.com/o/spaces%2FnXt8wjwK8SlPIzyfLwqU%2Fuploads%2FsQfeQuYmrE944rpEArgs%2FScreenshot%202026-08-24%20at%207.15.11%E2%80%AFPM%201.png?alt=media&amp;token=46c580fe-95c2-4a22-a310-8bb6bf84f894" alt=""><figcaption></figcaption></figure></div>

4. Select Edit from the menu, to configure it. Enter display name and toggle on 'Enable' and then click Save

<div data-with-frame="true"><figure><img src="https://1578258752-files.gitbook.io/~/files/v0/b/gitbook-x-prod.appspot.com/o/spaces%2FnXt8wjwK8SlPIzyfLwqU%2Fuploads%2FIGBxP0eyOQu0PL1VuRJY%2FScreenshot%202026-08-24%20at%207.18.19%E2%80%AFPM%201.png?alt=media&amp;token=8ac7fbc4-b4f2-4d31-94c7-f70b85b2c164" alt=""><figcaption></figcaption></figure></div>

#### 3. Consumer 360

Populations activated in Consumer 360 appear as pills on a member's profile if that member belongs to the population.

To configure:

1. Click Enable next to Consumer 360 in the Destinations tab
2. Go to Consumer 360 → Consumer Engine → Consumer Populations

<div data-with-frame="true"><figure><img src="https://1578258752-files.gitbook.io/~/files/v0/b/gitbook-x-prod.appspot.com/o/spaces%2FnXt8wjwK8SlPIzyfLwqU%2Fuploads%2FVmHY6w1rKmFGr81RZHEg%2FScreenshot%202026-08-24%20at%207.25.43%E2%80%AFPM%201.png?alt=media&amp;token=803e193d-3ec6-499b-911b-5c58898f5183" alt=""><figcaption></figcaption></figure></div>

3. Find the population you enabled. A cross in the Visible column means it isn't in use yet
4. Select Edit from the menu, to configure it. Enter display name and toggle on 'Enable' and then click Save

#### 4. Analytics, Public API, and Engagement

These destinations require no additional setup. Once you click Enable, the population is immediately available and ready to use.